Deleting downloaded files on the iPad means that you won’t be able to access them again. But it is often necessary to remove these files from your device to free some space and improve the performance.
You can delete downloads on your iPad from internal storage by going to Files > “On My iPad” and tapping on a specific file to delete it. It is also possible to delete downloaded files from iCloud or the Books and Settings app on your device.
We have written a detailed guide for deleting downloads on iPad with step-by-step instructions and why you should remove the unnecessary files.
Why Delete Downloads on iPad
There can be multiple reasons for deleting downloaded files, music, videos, and books on your iPad. A few of them can be the following.
- Unwanted and unnecessary downloads take up storage space.
- Downloads slow down the performance and speed of your iPad.
- Doing so makes it easier to find relevant files.
Deleting Downloads on iPad
Wondering how to delete downloads on the iPad to free storage space? Our 4 step-by-step methods will help you do this task without much effort.
Method #1: Delete Downloaded Files on iPad
You download many files on your iPad, which you may not need later. You can quickly delete these files with the following steps.
Step #1: Remove Files on iPad Internal Storage
Open the Files app on your iPad and tap “On My iPad.” Next, tap on the file you want to delete and press and hold the file till the “Delete“ option appears. Tap on “Delete” to remove the downloaded file on the iPad’s internal storage.
Step #2: Remove Files on iPad iCloud
If the files or folders are saved in iCloud, open the Files app on your iPad and click on the iCloud drive. Press and hold the file until the Delete menu appears. Finally, tap on the “Delete” option to remove the file from your iPad.
Step #3: Delete File Permanently
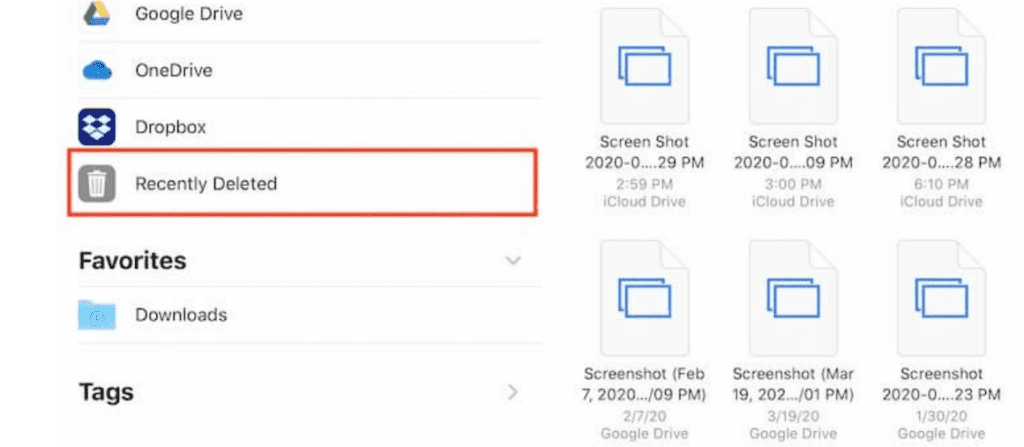
Open the Files app‘s sidebar and tap on the “Recently Deleted” icon to permanently delete the file. Tap “Select” > “Delete” to delete the file permanently.

Method #2: Delete Downloaded Videos on iPad
Videos take up a lot of space on your iPad. To delete downloaded videos, follow these steps.
- Open the Settings app on your iPad.
- Tap “General” > “iPad Storage“.
- Tap “Review Downloaded Videos” under “Recommendations“.
- Delete videos with the following steps.
- Swipe left on the video and tap “Delete” to delete a single video.
- To delete multiple videos, click “Edit” and tap the red minus (-) buttons next to the videos you want to delete.
The recommendation to remove downloaded videos will only appear if you downloaded videos on your iPad from Netflix, Fitness+, and other similar sources.
Method #3: Delete Downloaded Books on iPad
If you have downloaded too many books on your iPad and are unsure how to delete them, here is how.
- Open the Books app on your iPad.
- View the list of downloaded books in the “Library” and “Reading Now” categories.
- Find the book you want to delete and click on the three-dot icon to remove the book.

Method #4: Delete iTunes Downloads on the iPad
You can delete downloaded items such as music, TV shows, and movies from iTunes Store to your iPad in the following way.
- Open the Settings app and go to “General” > “iPad Storage“.
- Tap on Music, and swipe left on a song, album, or artist to delete it.

- Tap on the Apple TV app to delete TV shows and movies.
Use Third-Party Apps To Delete Downloads on iPad
Third-party apps like Dr.Fone – Data Eraser, PanFone, etc., can be used to free up storage space by deleting downloaded files in the junk folder. You need to download and install this software on your computer. Next, connect your iPad to the computer via USB cable.
Afterward, you can quickly free up space by deleting unwanted downloaded files.
Summary
In this guide on how to delete downloads on iPad, we have looked into the reasons for deleting downloaded files, videos, books, and music on iPad and how it is possible using multiple methods.
Hopefully, you can now delete downloads that take extra space on your iPad.
Frequently Asked Questions
Open the Settings app and click on Safari to clear all online history on an iPad. Scroll down to “Clear History and Website Data” and tap it. A popup window will open; tap “Clear“. This will clear all pre-loaded login information and Safari history.
To use split-screen on the iPad, open an app on the iPad. Tap the three dots at the center of the screen to open the multitasking menu. Tap the icon in the center to open “Split View“.
The app on the screen will move to the far left side of the iPad, and a message will appear in the multitasking area to choose another app. Once you select another app, the two apps will appear side by side on the screen.


